Blast UE4 Plugin Quick Start
Blast is a new NVIDIA GameWorks destruction library. It was fully integrated in UE4 as a separate plugin. This plugin is intended to replace APEX destruction as faster, more flexible and feature rich solution for making destructible game objects.
This is a plugin guide. For the original Blast library documentation and sources visit https://github.com/NVIDIAGameWorks/Blast.
Features
- Rich in-editor asset authoring
- Flexible damage system
- Impact damage
- Stress-based damage
- Debris
- Effects/Sounds hook up callbacks
- Both static and dynamic actors
- Blueprint friendly
- Minimum engine changes
Quick Start
If you want to try it out before getting into more details, just do the following:
1 Create a new UE4 project selecting First Person Template with Starter Content.
2 In Content Browser, select the Content folder and type 1M_Cube in the search field. You should see the cube static mesh. You can also use any other static mesh if you like. Right click on it and select Create Blast Mesh.
3 Double click the created Blast Asset (1M_Cube_Blast). This will open the Blast UE4 Mesh Editor window. Click on the Fracture button on the top panel. You should now see the fractured cube. You can use the Explode Amount slider and adjust the camera position to view each chunk.
4 Close Blast UE4 Mesh Editor and save the Blast Asset. Drag the resulting Blast Asset into the UE4 scene. A Blast Actor will be created from it.
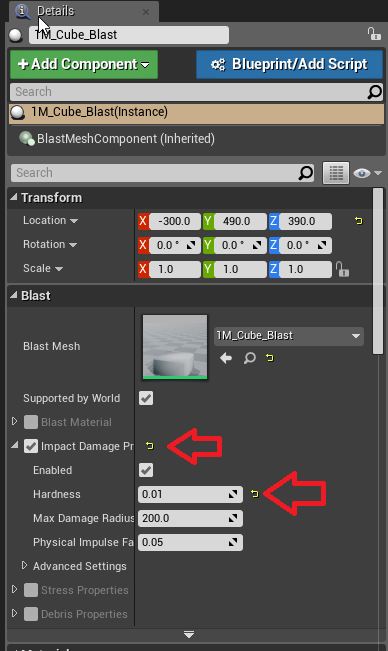
5 The easiest way to fracture it, is to make it fragile and let it fall on the ground. To do so, select the created Blast Actor and select BlastMeshComponent in the Details panel. In the Blast section, turn on Impact Damage Properties override and change Hardness to 0.01 or lower to make it fragile.
6 Raise the object above the ground and hit the Play button. The cube should fall and fracture in pieces.
7 If you want to fracture it by shooting with the gun, you need to edit the FirstPersonProjectile asset. There are 2 ways to do it:
- Pass BoneName from Event Hit Hit field into the Add Impulse At Location function. So that the impulse will reach the Blast Actor bone.

- Even better, remove all BP logic (or just detach the Event Hit callback). Select CollisionComponent, toggle Simulate Physics ON and set Collision Enabled to Physics Only (in the Collision/Collision Presets section). That will make the projectile a regular physical object that will bounce and break Blast Actors too.


Overview
In order to add destructible objects, you first need a Blast Asset. It is essentially a new type of Skinned Mesh Asset which represents a destructible asset. There are 2 ways to create it: either import one or create it from static mesh. Look in Blast UE4 Mesh Editor Documentation for more details.
Once you have a Blast Asset you can place it in the scene as usual. A simple Actor will be created with a BlastMeshComponent attached. We will refer to it as Blast Actor from now on, but it all refers to this BlastMeshComponent.
By default, Blast Actor behaves like a regular physically simulated dynamic object. To make it static see Making Blast Actor Static.
Blast Actor can be damaged and broken into pieces, there are few ways to do it:
- Impact damage (colliding it with other physical objects)
- Calling Blast Actor (or BlastMeshComponent in particular) damage API from BP or from code
- Stress-based damage
Damage
Blast damage model is described in details in Blast Docs. But essentially all you need to know is that Blast Actor contains a Support Graph (collection of nodes and bonds). Think of it as a skeleton or carcass which holds the object together. Damage is applied on bonds (if present) or on the chunk itself (usually on small chunks of lower level of hierarchy).
In every damage event, some damage program is involved (so called Damage Shader) which takes as input damage parameters and material, and produces damage commands to reduce health on some bonds and/or chunks. The Plugin allows you to write your own damage programs as well, but provides default ones which cover most cases.
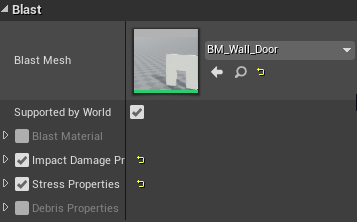
All default damage settings are set per Blast Asset, but can be overwritten per Blast Actor. So all the parameters below can be set either in Blast UE4 Mesh Editor by double clicking on an asset or on the Blast Actor itself (in Details Panel), by toggling on the respective override flag. In this example, Impact Damage Properties and Stress Properties are overriden:
All damage settings have a descriptive hint when hovering over them (as well as in-code comments), so this documentation will only give a general overview.
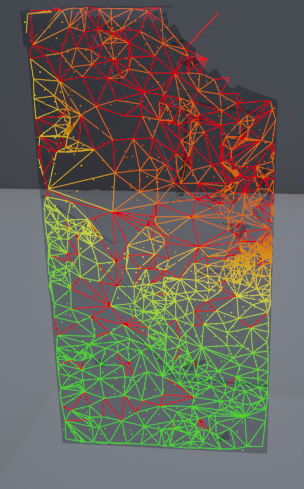
You can view/debug render the Support Graph, see Debug Render.
Support Graph debug render (red bonds have lower health because of prior damage events):
Blast Material
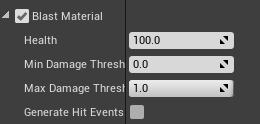
Mainly, material sets how much health every bond and chunk in destructible object have. Every damage event can diminish health. Once it reaches 0, the bond/chunk is broken. Blast Material also allows to filter out small damage events, so that small damage events do not affect health and will not accumulate. It also allows to clamp large damage events, for example if you do not want to fracture objects in pieces with only one damage event ever.
Blast Material is involved in all types of damage except for the stress-based.
Impact Damage
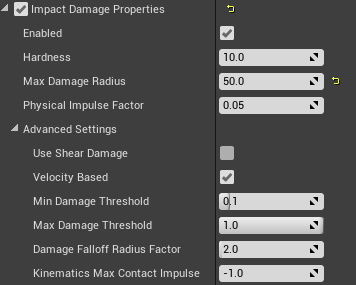
Impact damage happens on collision of Blast Actor with any physical object, both kinematic and dynamic (marked as physically simulated). To do that, a Blast Actor subscribes to its OnComponentHit callback, so all the usual UE4 rules of collision callbacks apply. If impact damage does not happen:
1 Check on Blast Actor if Impact Damage Enabled is ON.
2 Set Blast Actor Hardness to a very low value like 0.001 to make it super fragile while testing.
3 On the colliding object check in the Collision section specifically that Simulation Generates Hit Events is ON, Collision Enabled is set to Query and Physics and Object Types are compatible for Block collision.
Damage API
There is a set of damage functions which can be called from BP or from code. You can call them on specific Blast Actor or on an area, so that it will search for Blast Actor around in overlap volume. For that every function has static version with All postfix. Examples:
- ApplyRadialDamage and ApplyRadialDamageAll - radial/sphere-shaped damage
- ApplyCapsuleDamage and ApplyCapsuleDamageAll - capsule/capsule shaped damage (can be used for cut-like, laser beam, sword damage)
There are also some methods which can be called only from code, but they allow to execute custom damage program, like: ApplyDamageProgram, ApplyDamageProgramOverlap, ApplyDamageProgramOverlapAll
Stress-Based Damage
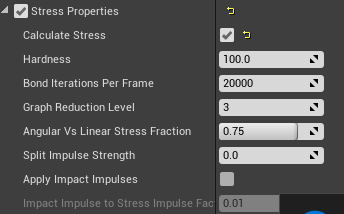
On any Blast Actor/Blast Asset you can enable stress solver. The most common usage is just applying gravity force on a static construction so that it will fall apart at some point when the carcass cannot hold anymore. Dynamic actors are also supported, you could for example add centrifugal force so that rotating an object fast enough will break bonds.
It calculates stress on Support Graph every frame. The quality vs computational cost trade off can be set on both ends of spectrum with its BondIterationsPerFrame setting.
It also can be used as another way to apply impact damage, which can give the visually pleasant result of an actor breaking in a weak place instead of the place of contact.
It uses Support Graph, but optionally simplifies it with GraphReductionLevel setting. The smaller the stress graph is, the more precise stress calculation happens in the same time interval, but the overall structure representation by this simplified graph becomes more imprecise.
You can view/debug render the stress graph, see Debug Render.
Adding Effects
Blast Actor/BlastMeshComponent provides a set of damage callbacks on which you can subscribe. This is a good place to hookup additional effects, like smoke and dust.
From Blast perspective, Actor has a bit different meaning. Actor is any independent island of chunks, just like the PhysX kind of actor consisting of shapes. A Blast Actor can have a lot of live Actors (also called chunk islands, bones) at any moment. So when Blast Actor fractures in parts, one big Actor is destroyed and few small Actors are created. Hence there are OnActorDestroyed and OnActorCreated callbacks. There are also methods to get an Actor’s COM and position: GetActorWorldTransform and GetActorCOMWorldPosition.
For more detailed effect placement use per-bond or per-chunk damage callbacks: OnBondsDamaged and OnChunksDamaged.
For samples see /Game/Maps/BlastVFXSampleMap.BlastVFXSampleMap’
Making Blast Actor Static
By default any Blast Actor is dynamic. There are 2 ways to make it static:
- Mark 1 or more chunks as static in Blast Mesh Editor. So that any Blast Actor which contains this chunk becomes static. For example if you have a statue on a pedestal, you can mark the pedestal chunk as static. While it exists, the statue will be static. Once the pedestal is broken into pieces, the statue detaches.
- The same effect can be achieved with the special Blast Glue Volume. Place it in the scene and any chunk inside of this volume becomes static. Note: It is important to call Build Blast Glue or the whole Build Scene step in order to apply Blast Glue Volume. Blast Actor/BlastMeshComponent must have the Supported By World setting truned ON. Moving volumes or actors requires rebuilding.

Debris Properties
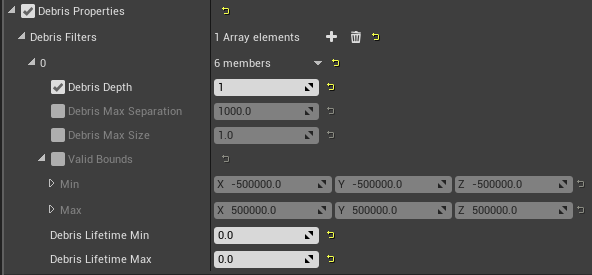
You can limit chunks lifetime using Debris Filter. Intuitively it means that for example you can limit lifetime of chunks that are too small, or too separated from origin, or leave some defined bounding box. Use Debris Filter properties for that. You can define multiple filters each of them will act separately. For example you can set that all chunks which fly too far away from origin must be removed with one filter. And set that chunks on depth 5 should live 10 seconds and be removed.
Debug Render
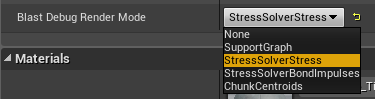
Blast Actor/BlastMeshComponent comes with debug render options in editor in order to see what is going on under the hood. Look for Blast Debug Render Mode setting under Blast/Advanced section. It allows to draw:
- Support Graph
- Stress Graph
- Chunk Centroids
Consider using wireframe mode (F1) together with it.
You can also view collision shapes by toggling Show/Collision in the usual UE4 viewport menu on the top.